Screen Labels
Adding screen lables is a very similar process to adding screen markers. Screen labels are 2D labels that follow a location on the globe or map. As the user moves, they move, but don’t get any bigger or smaller. You have a lot of control over how they look and interact, but they’re simple to use.
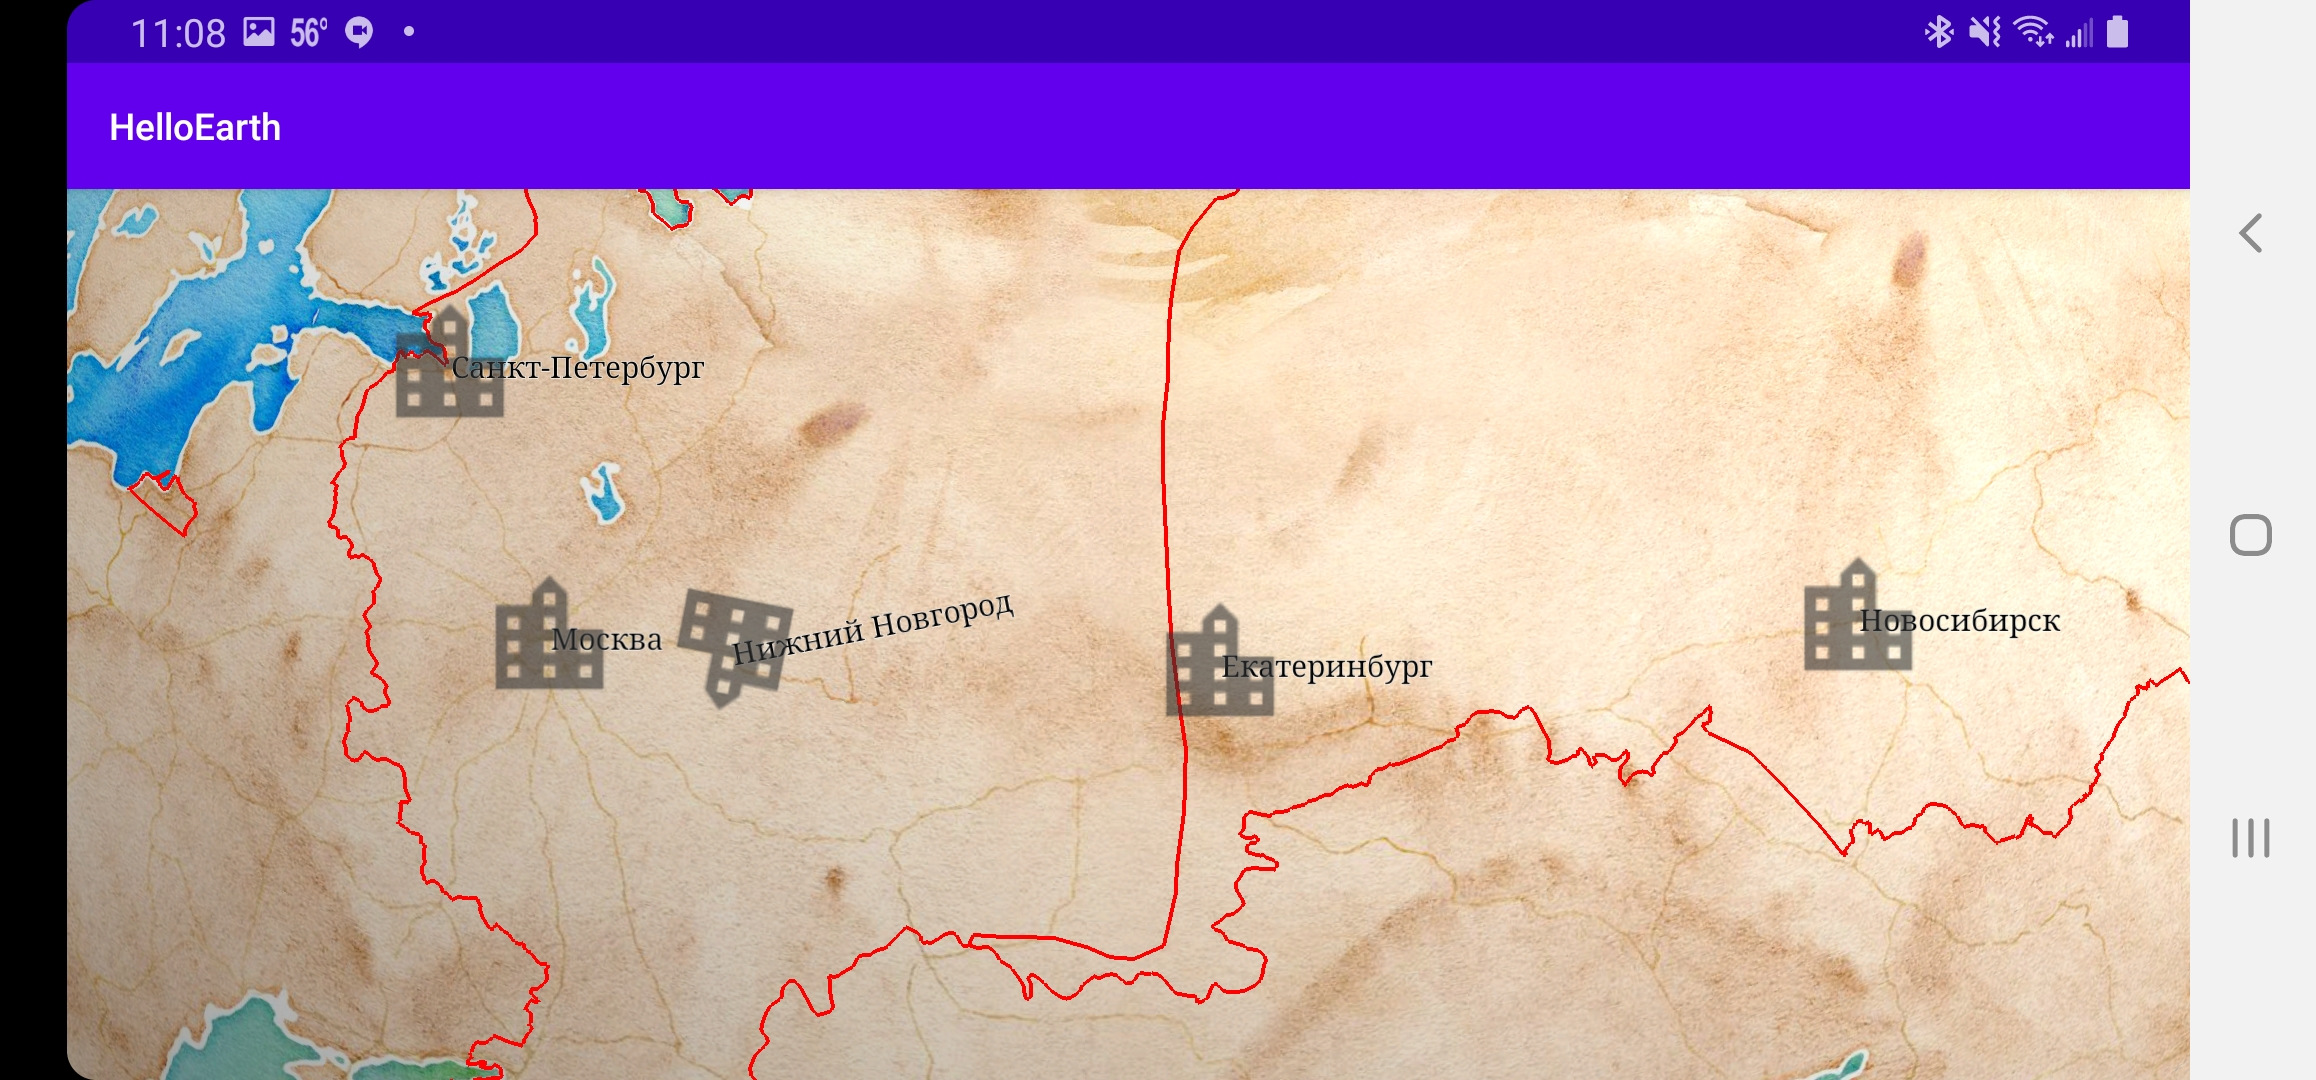
In our last tutorial we added some markers for the five largest cities in Russia. Since WhirlyGlobe-Maply supports UTF-8 strings, we’re going to show off some cyrillic labels. We are going to add to our HelloLabelFragment.java. Just comment out insertMarkers(); in the controlHasStarted method and put in insertLabels(); instead.
Add Labels
Now, we are going to paste in what we going to declare our labels in a similar way that we did with our markers. Paste in the following method.
package com.mousebirdconsulting.helloearth;

import android.graphics.Color;
import android.graphics.Typeface;

import com.mousebird.maply.BaseController;
import com.mousebird.maply.ComponentObject;
import com.mousebird.maply.LabelInfo;
import com.mousebird.maply.Point2d;
import com.mousebird.maply.ScreenLabel;

import java.util.ArrayList;
import java.util.List;

public class HelloLabelFragment extends HelloMarkerFragment {

    @Override
    protected void controlHasStarted() {
        super.controlHasStarted();

        // Insert Labels
        insertLabels();
    }

    private void insertLabels() {
        List<ScreenLabel> labels = new ArrayList<>();

        LabelInfo labelInfo = new LabelInfo();
        labelInfo.setFontSize(30f);
        labelInfo.setTextColor(Color.BLACK);
        labelInfo.setTypeface(Typeface.SERIF);
        labelInfo.setLayoutPlacement(LabelInfo.LayoutRight);
        labelInfo.setOutlineColor(Color.WHITE);
        labelInfo.setOutlineSize(1.f);

        float layoutImportance = 1.f;

        // Moscow - Москва
        ScreenLabel label = new ScreenLabel();
        label.loc = Point2d.FromDegrees(37.616667, 55.75); // Longitude, Latitude
        label.text = "Москва";
        label.layoutImportance = layoutImportance++;
        labels.add(label);

        //  Saint Petersburg - Санкт-Петербург
        label = new ScreenLabel();
        label.loc = Point2d.FromDegrees(30.3, 59.95);
        label.text = "Санкт-Петербург";
        label.layoutImportance = layoutImportance++;
        labels.add(label);

        // Novosibirsk - Новосибирск
        label = new ScreenLabel();
        label.loc = Point2d.FromDegrees(82.95, 55.05);
        label.text = "Новосибирск";
        label.layoutImportance = layoutImportance++;
        labels.add(label);

        // Yekaterinburg - Екатеринбург
        label = new ScreenLabel();
        label.loc = Point2d.FromDegrees(60.583333, 56.833333);
        label.text = "Екатеринбург";
        label.layoutImportance = layoutImportance++;
        labels.add(label);

        // Nizhny Novgorod - Нижний Новгород
        label = new ScreenLabel();
        label.loc = Point2d.FromDegrees(44.0075, 56.326944);
        label.text = "Нижний Новгород";
        label.layoutImportance = layoutImportance++;
        label.rotation = Math.PI / 8;
        labels.add(label);

        // Add your markers to the map controller.
        ComponentObject co = globeControl.addScreenLabels(labels, labelInfo, BaseController.ThreadMode.ThreadAny);
    }
}
Notice there is a LabelInfo options object that defines how the text is going to look. setLayoutPlacement is an important LabelInfoproperty to set, because this determines the placement of the label in relation to the loc point. LabelInfo.LayoutRight means that the label is placed directly to the right of the loc point. Your other options are LabelInfo.LayoutLeft and LabelInfo.LayoutCenter.
Then, we create each label, set their properties, and add them to the map controller.
Once again, reference the new fragment:
<?xml version="1.0" encoding="utf-8"?>
<androidx.constraintlayout.widget.ConstraintLayout xmlns:android="http://schemas.android.com/apk/res/android"
    xmlns:app="http://schemas.android.com/apk/res-auto"
    xmlns:tools="http://schemas.android.com/tools"
    android:id="@+id/relativeLayout"
    android:layout_width="match_parent"
    android:layout_height="match_parent"
    tools:context=".MainActivity">

    <fragment
        android:id="@+id/fragment"
        android:name="com.mousebirdconsulting.helloearth.HelloLabelFragment"
        android:layout_width="match_parent"
        android:layout_height="match_parent"
        app:layout_constraintBottom_toTopOf="parent"
        app:layout_constraintEnd_toStartOf="parent"
        app:layout_constraintStart_toStartOf="parent"
        app:layout_constraintTop_toTopOf="parent" />

</androidx.constraintlayout.widget.ConstraintLayout>
Layout Engine
In addition to a location and text property for a ScreenLabel, we have a layoutImportance. Because labels often overlap or collide, we have a layout engine that helps us figure out which ones we want to draw. When two labels collide, the one that is rendered is the one with the higher layoutImportance floating point value. If you want all labels rendered regardless of collision, set the layoutImportance to Float.MAX_VALUE.
Lastly, we can rotate our screen labels in the same way that we did with screen markers. You will see that Нижний Новгород is slightly rotated counter-clockwise becaue we set a rotation of Math.PI / 8.
Tutorial by Nicholas Hallahan, Steve Gifford, Tim Sylvester.