Screen Labels
Screen labels are 2D labels that follow a location on the globe or map. As the user moves, they move, but don’t get any bigger or smaller. You have a lot of control over how they look and interact, but they’re simple to use.
We’re going to make use of country outlines from the Vector Data tutorial if you have not yet. If you don’t have a project, build one with the Hello Earth tutorial and you can use this ViewController (for Objective-C or Swift). You’ll also need the source data from that tutorial.
Country Outlines
Let’s take a quick look at our project from before. There’s a method in there called addCountries that we’ll be expanding.
-
- (void)addCountries { // handle this in another thread dispatch_async(dispatch_get_global_queue(DISPATCH_QUEUE_PRIORITY_DEFAULT,0), ^{ NSArray *allOutlines = [[NSBundle mainBundle] pathsForResourcesOfType:@"geojson" inDirectory:nil]; for (NSString *outlineFile in allOutlines) { NSData *jsonData = [NSData dataWithContentsOfFile:outlineFile]; if (jsonData) { MaplyVectorObject *wgVecObj = [MaplyVectorObject VectorObjectFromGeoJSON:jsonData]; // the admin tag from the country outline geojson has the country name save NSString *vecName = [[wgVecObj attributes] objectForKey:@"ADMIN"]; wgVecObj.userObject = vecName; // add the outline to our view MaplyComponentObject *compObj = [theViewC addVectors:[NSArray arrayWithObject:wgVecObj] desc:vectorDict]; // If you ever intend to remove these, keep track of the MaplyComponentObjects above. } } }); } -
private func addCountries() { // handle this in another thread let queue = DispatchQueue.global() queue.async { let allOutlines = Bundle.main.paths(forResourcesOfType: "geojson", inDirectory: nil) as! [String] for outline in allOutlines { if let jsonData = NSData(contentsOfFile: outline), let wgVecObj = MaplyVectorObject(fromGeoJSON: jsonData) { // the admin tag from the country outline geojson has the country name save if let attrs = wgVecObj.attributes, let vecName = attrs.objectForKey("ADMIN") as? NSObject { wgVecObj.userObject = vecName } // add the outline to our view let compObj = self.theViewC?.addVectors([wgVecObj], desc: self.vectorDict) // If you ever intend to remove these, keep track of the MaplyComponentObjects above. } } } }
As a reminder, that routine is doing the following.
- Kicking off another thread.
- Loading each and every GeoJSON file it finds.
- Adding them as vectors.
We’re going to make a really minor tweak to add a MaplyScreenLabel per country.
Screen Labels
We’ll be adding code right after the line where it says the following.
// If you ever intend to remove these, keep track of the MaplyComponentObjects above.For Swift, we’ll do it after the line where we assign vecName to userObject attribute.
Here’s the plan. We’ll create a MaplyScreenLabel, give it a location and some text and then add it. Adding it involves a little styling, but we’ll keep it simple.
-
// Add a screen label per country if ([vecName length] > 0) { MaplyScreenLabel *label = [[MaplyScreenLabel alloc] init]; label.text = vecName; label.loc = [wgVecObj centroid]; label.selectable = true; [theViewC addScreenLabels:@[label] desc: @{ kMaplyFont: [UIFont boldSystemFontOfSize:14.0], kMaplyTextOutlineColor: [UIColor blackColor], kMaplyTextOutlineSize: @(2.0), kMaplyColor: [UIColor whiteColor] }]; } -
if vecName.description.characters.count > 0 {
    let label = MaplyScreenLabel()
    label.text = vecName.description
    label.loc = wgVecObj.centroid()
    label.selectable = true
    self.theViewC?.addScreenLabels([label],
        desc: [
            kMaplyFont: UIFont.boldSystemFontOfSize(14.0),
            kMaplyTextOutlineColor: UIColor.black,
            kMaplyTextOutlineSize: 2.0,
            kMaplyColor: UIColor.white
        ])
}
So labels! Great! And they move around but stay the same size! Let’s look a little closer.
Label Details
Let’s look at what we did there. First, we created a MaplyScreenLabel. We gave it some text, which was the country name and we gave it a location, the middle point of the country. For this, it’s recommended to use the centroid of the polygon, instead of just the center. This gives you more accurate results for countries with outlier regions. And you don’t want your label to be placed outside the country, do you?
Then it gets interesting. You may notice we’re calling addScreenLabels to, ya know, add the labels. This method takes an array, so we make a small one and it takes a description dictionary.
Description dictionaries are a little wacky. Rather than specify everything in the MaplyScreenLabel, we stuff much of it in an NSDictionary and pass that in. This lets us leave lots of stuff out and gives it a styling sort of feel.
The description dictionary contains entries for the font, outline details, and the text color. Consult the addScreenLabels method documentation for a full list of options.
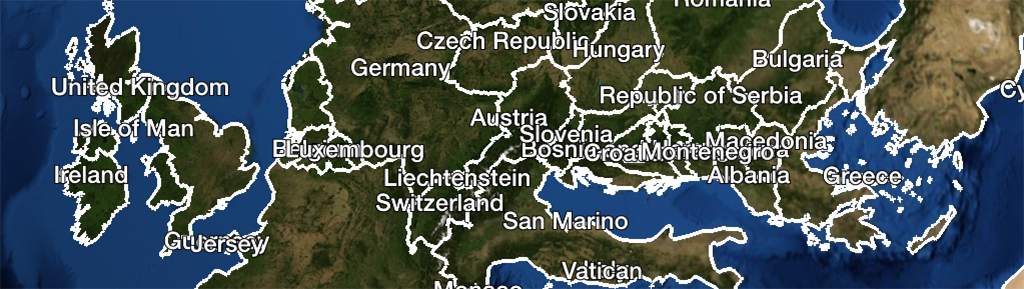
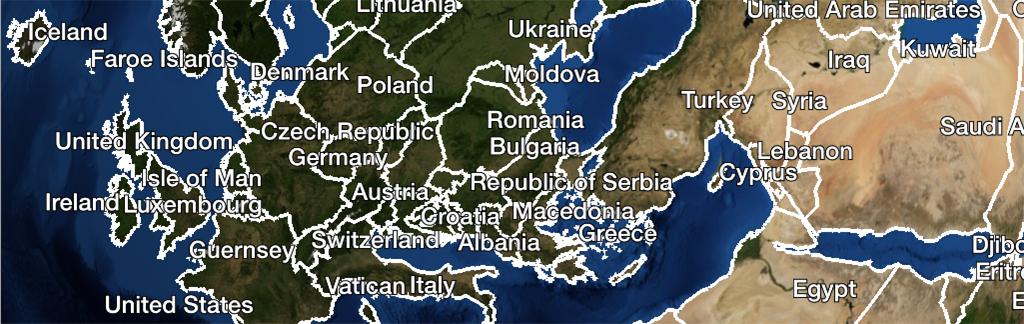
But there’s one problem. Those labels are all on top of each other. Can we do anything about that?
Layout Engine
WhirlyGlobe-Maply has an interactive label and marker layout engine. All you have to do is use it. Right when you create the MaplyScreenLabel do this.
-
label.layoutImportance = 10.0; -
label.layoutImportance = 10
Now it looks like this.
To ignore the layout engine, layoutImportance to MAXFLOAT. Otherwise, it’s just a number we use for sorting. Assign it however you like.