Spheres
You can add a variety of 3D shapes to a globe or even a map. We’ll start with a simple one, spheres.
We’ll need an XCode project here, so if you haven’t done the Hello Earth tutorial go do that. If you haven’t got one yet, here’s a suitable ViewController (for Objective-C or Swift).
Placing Spheres
Like everything else, spheres have a location on the globe (or map). We’ll need some locations to use. If you’ve been through the Screen Markers tutorial these will be familiar.
We’ll also need a bit of logic to add the spheres, though that’s not too hard. Let’s look at some code. Add this to your ViewController.
-
- (void)addSpheres { // set up some locations MaplyCoordinate capitals[10]; capitals[0] = MaplyCoordinateMakeWithDegrees(-77.036667, 38.895111); capitals[1] = MaplyCoordinateMakeWithDegrees(120.966667, 14.583333); capitals[2] = MaplyCoordinateMakeWithDegrees(55.75, 37.616667); capitals[3] = MaplyCoordinateMakeWithDegrees(-0.1275, 51.507222); capitals[4] = MaplyCoordinateMakeWithDegrees(-66.916667, 10.5); capitals[5] = MaplyCoordinateMakeWithDegrees(139.6917, 35.689506); capitals[6] = MaplyCoordinateMakeWithDegrees(166.666667, -77.85); capitals[7] = MaplyCoordinateMakeWithDegrees(-58.383333, -34.6); capitals[8] = MaplyCoordinateMakeWithDegrees(-74.075833, 4.598056); capitals[9] = MaplyCoordinateMakeWithDegrees(-79.516667, 8.983333); // work through the spheres NSMutableArray *spheres = [NSMutableArray array]; for (unsigned int ii=0;ii<10;ii++) { MaplyShapeSphere *sphere = [[MaplyShapeSphere alloc] init]; sphere.center = capitals[ii]; sphere.radius = 0.01; [spheres addObject:sphere]; } [theViewC addShapes:spheres desc: @{ kMaplyColor: [UIColor colorWithRed:0.75 green:0.0 blue:0.0 alpha:0.75] }]; } -
private func addSpheres() {
    let capitals = [MaplyCoordinateMakeWithDegrees(-77.036667, 38.895111),
                    MaplyCoordinateMakeWithDegrees(120.966667, 14.583333),
                    MaplyCoordinateMakeWithDegrees(55.75, 37.616667),
                    MaplyCoordinateMakeWithDegrees(-0.1275, 51.507222),
                    MaplyCoordinateMakeWithDegrees(-66.916667, 10.5),
                    MaplyCoordinateMakeWithDegrees(139.6917, 35.689506),
                    MaplyCoordinateMakeWithDegrees(166.666667, -77.85),
                    MaplyCoordinateMakeWithDegrees(-58.383333, -34.6),
                    MaplyCoordinateMakeWithDegrees(-74.075833, 4.598056),
                    MaplyCoordinateMakeWithDegrees(-79.516667, 8.983333)]

    // convert capitals into spheres. Let's do it functional!
    let spheres = capitals.map { capital -> MaplyShapeSphere in
        let sphere = MaplyShapeSphere()
        sphere.center = capital
        sphere.radius = 0.01
        return sphere
    }

    self.theViewC?.addShapes(spheres, desc: [
        kMaplyColor: UIColor(red: 0.75, green: 0.0, blue: 0.0, alpha: 0.75)])
}
Also add this to your viewDidLoad method to run it.
-
// add some spheres [self addSpheres]; -
// add some spheres addSpheres()
Go ahead and run it and you should get something like this.
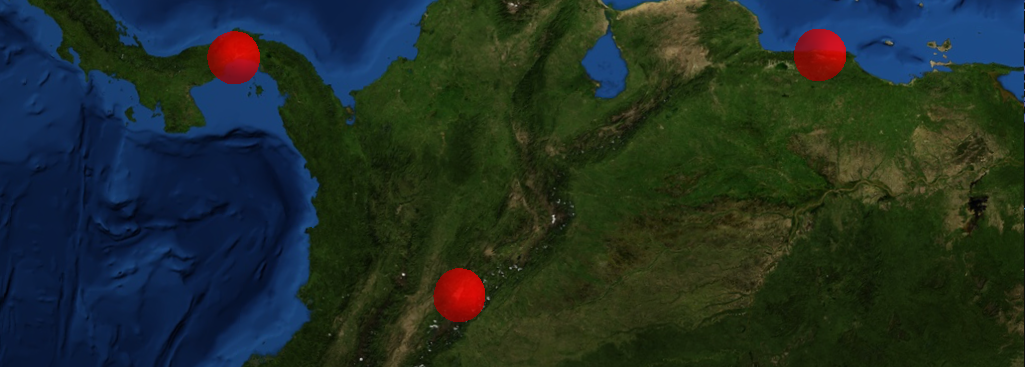
So spheres! Let’s see how that works.
Sphere Details
In the end, this isn’t too tricky. We create a MaplyShapeSphere, give it a location and size. That number for sizes is a little odd.
In WhirlyGlobe-Maply sizes like this are in display space. That’s based on the earth with a radius of 1.0 and all sizes are relative to that. If you want meters, just multiply by the radius of the earth in meters.
We add each of those spheres to an array and then create the spheres in the view controller all at once. This is for performance.
The description dictionary contains one entry for color. We’re making these spheres a little transparent and red. Because that looks cool, really.