Vector Selection
Displaying data is one thing, but we’d also like to touch it. WhirlyGlobe-Maply has a wealth of interactive features. Let’s start with selection and annotations.
You’ll need to have done the Vector Data tutorial. Open your HelloEarth project and get ready.

If you haven’t got one here is a suitable ViewController file to start with (for Objective-C or Swift). This version handles both a globe and a map and makes a nice starting point.
Let’s start with annotations.
Annotations
A MaplyAnnotation is a little UIView that you place at a geo location. It will follow that location on the map or globe as the user moves around.
We’ll create one of these annotations where the user taps or selects a country. Let’s start with the addAnnotation method.
Open ViewController. Add a new private method (in the @interface section in Objective-C or prefixed with “private” in Swift). This method will create an annotation with a given title, subtitle, and location. We can use this with both map and globe. Note you need to add this method’s prototype to the ViewController.h file if you’re using Objective-C:
- (void) addAnnotation:(NSString *)title withSubtitle:(NSString *)subtitle at: (MaplyCoordinate)coord;Now, fill that method in.
-
- (void)addAnnotation:(NSString *)title withSubtitle:(NSString *)subtitle at:(MaplyCoordinate)coord { [theViewC clearAnnotations]; MaplyAnnotation *annotation = [[MaplyAnnotation alloc] init]; annotation.title = title; annotation.subTitle = subtitle; [theViewC addAnnotation:annotation forPoint:coord offset:CGPointZero]; } -
private func addAnnotationWithTitle(title: String, subtitle: String, loc:MaplyCoordinate) {
    theViewC?.clearAnnotations()

    let a = MaplyAnnotation()
    a.title = title
    a.subTitle = subtitle

    theViewC?.addAnnotation(a, forPoint: loc, offset: CGPointZero)
}
That will add an annotation at a given point, but we still need to wire up tapping and selection.
Delegates for Tapping
To get taps and selection we need to fill in either the WhirlyGlobeViewControllerDelegate protocol (for globes), or the MaplyViewControllerDelegate protocol (for maps). We assign ourselves as a delegate and implement any tap or selection methods we’re interested in. Let’s try taps first.
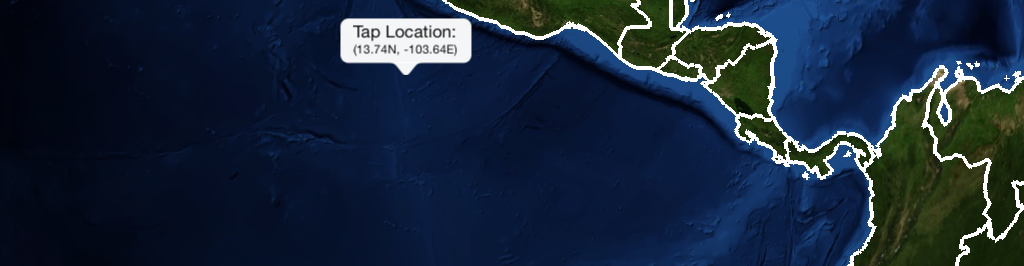
We’re going to pop up a little annotation to show where the user tapped.
Modify the ViewController to include the two protocols. (There’s no harm in doing so, all the methods are optional.). In Objective-C, this is done in the ViewController.h. In Swift, in the ViewController.swift file.
-
@interface ViewController : UIViewController <WhirlyGlobeViewControllerDelegate,MaplyViewControllerDelegate> -
class ViewController: UIViewController,
                      WhirlyGlobeViewControllerDelegate,
                      MaplyViewControllerDelegate {
...
Set your map or view controller’s delegate in the viewDidLoad method. This will work if you have either map or globe.
-
// If you're doing a globe if (globeViewC != nil) globeViewC.delegate = self; // If you're doing a map if (mapViewC != nil) mapViewC.delegate = self; -
// If you're doing a globe
if let globeViewC = globeViewC {
    globeViewC.delegate = self
}

// If you're doing a map
if let mapViewC = mapViewC {
    mapViewC.delegate = self
}
Tapping and selection differ between the map and globe. We’ll fill in both delegates like so.
-
- (void)globeViewController:(WhirlyGlobeViewController *)viewC didTapAt:(MaplyCoordinate)coord { NSString *title = @"Tap Location:"; NSString *subtitle = [NSString stringWithFormat:@"(%.2fN, %.2fE)", coord.y*57.296,coord.x*57.296]; [self addAnnotation:title withSubtitle:subtitle at:coord]; } - (void)maplyViewController:(MaplyViewController *)viewC didTapAt:(MaplyCoordinate)coord { NSString *title = @"Tap Location:"; NSString *subtitle = [NSString stringWithFormat:@"(%.2fN, %.2fE)", coord.y*57.296,coord.x*57.296]; [self addAnnotation:title withSubtitle:subtitle at:coord]; } -
func globeViewController(viewC: WhirlyGlobeViewController, didTapAt coord: MaplyCoordinate) {
    let subtitle = NSString(format: "(%.2fN, %.2fE)", coord.y*57.296,coord.x*57.296) as String
    addAnnotationWithTitle("Tap!", subtitle: subtitle, loc: coord)
}

func maplyViewController(viewC: MaplyViewController, didTapAt coord: MaplyCoordinate) {
    let subtitle = NSString(format: "(%.2fN, %.2fE)", coord.y*57.296,coord.x*57.296) as String
    addAnnotationWithTitle("Tap!", subtitle: subtitle, loc: coord)
}
That’s it! Build and run, and each time you tap (outside a vector), an annotation will appear at the tapped location indicating its latitude and longitude.
Delegates for Selection
WhirlyGlobe-Maply will do all the work for feature selection. You just have to tell it you’re interested. That’s what the following delegate methods will do. Add these in ViewController:
-
// Unified method to handle the selection - (void) handleSelection:(MaplyBaseViewController *)viewC selected:(NSObject *)selectedObj { // ensure it's a MaplyVectorObject. It should be one of our outlines. if ([selectedObj isKindOfClass:[MaplyVectorObject class]]) { MaplyVectorObject *theVector = (MaplyVectorObject *)selectedObj; MaplyCoordinate location; if ([theVector centroid:&location]) { NSString *title = @"Selected:"; NSString *subtitle = (NSString *)theVector.userObject; [self addAnnotation:title withSubtitle:subtitle at:location]; } } } // This is the version for a globe - (void) globeViewController:(WhirlyGlobeViewController *)viewC didSelect:(NSObject *)selectedObj { [self handleSelection:viewC selected:selectedObj]; } // This is the version for a map - (void) maplyViewController:(MaplyViewController *)viewC didSelect:(NSObject *)selectedObj { [self handleSelection:viewC selected:selectedObj]; } -
// Unified method to handle the selection
private func handleSelection(selectedObject: NSObject) {
    if let selectedObject = selectedObject as? MaplyVectorObject {
        let loc = selectedObject.centroid()
        addAnnotationWithTitle("selected", subtitle: selectedObject.userObject as! String, loc: loc)
    }
    else if let selectedObject = selectedObject as? MaplyScreenMarker {
        addAnnotationWithTitle("selected", subtitle: "marker", loc: selectedObject.loc)
    }
}

// This is the version for a globe
func globeViewController(viewC: WhirlyGlobeViewController, didSelect selectedObj: NSObject) {
    handleSelection(selectedObj)
}

// This is the version for a map
func maplyViewController(viewC: MaplyViewController, didSelect selectedObj: NSObject) {
    handleSelection(selectedObj)
}
Before trying this, you need to make your vectors selectable. They aren’t by default. Just set the “selectable” flag of your MaplyVectorObject to true. That’s it. In your code, you can do this after creating the MaplyVectorObject object.
-
wgVecObj.selectable = YES; -
wgVecObj.selectable = true
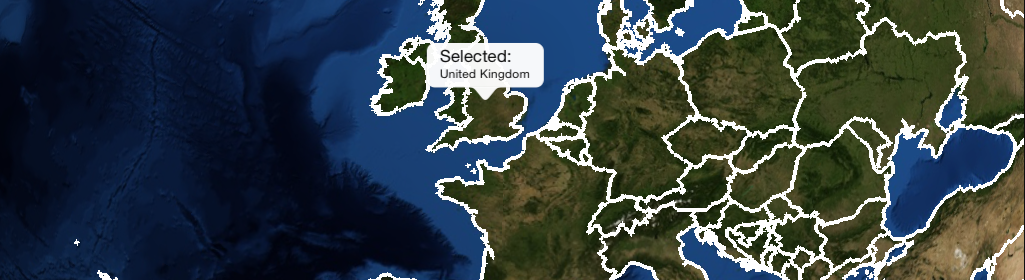
Now run that and try selecting a few countries.
Nice, but there were a few moving parts. Let’s look closer.
Code Breakdown
If you remember the Vector Data tutorial, we added each country outline to the MaplyBaseViewController. Before we did, we pulled out the @”ADMIN” field and stored that in the MaplyVectorObject userObject field. We’re using that here in the selection delegates.
When the toolkit notices the user selected a feature, it calls the appropriate delegate method and passes in a selected object, which can be any one of the standard Maply objects. We check for the type and then do something base one that.
In this case we’re looking for MaplyVectorObjects and when we see one we consult its userObject. We happen to know that’s an NSString so we figure out the center of the MaplyVectorObject and pop up an annotation with a little bit of info.
That’s all there is to it, but it was a lot of code. Here’s a working ViewController if you need it (for Objective-C or Swift).